Quick Start
In this section, we will introduce how to build a simple micro page (taking an application micro page as an example) and explain how to view the current data of components.
In this example, you can build a custom page without writing any backend code
It will use the GraphQL interface to fetch data and display the content on the page through widgets.
Create a Micro Page
Goal: Create an "Application" micro page
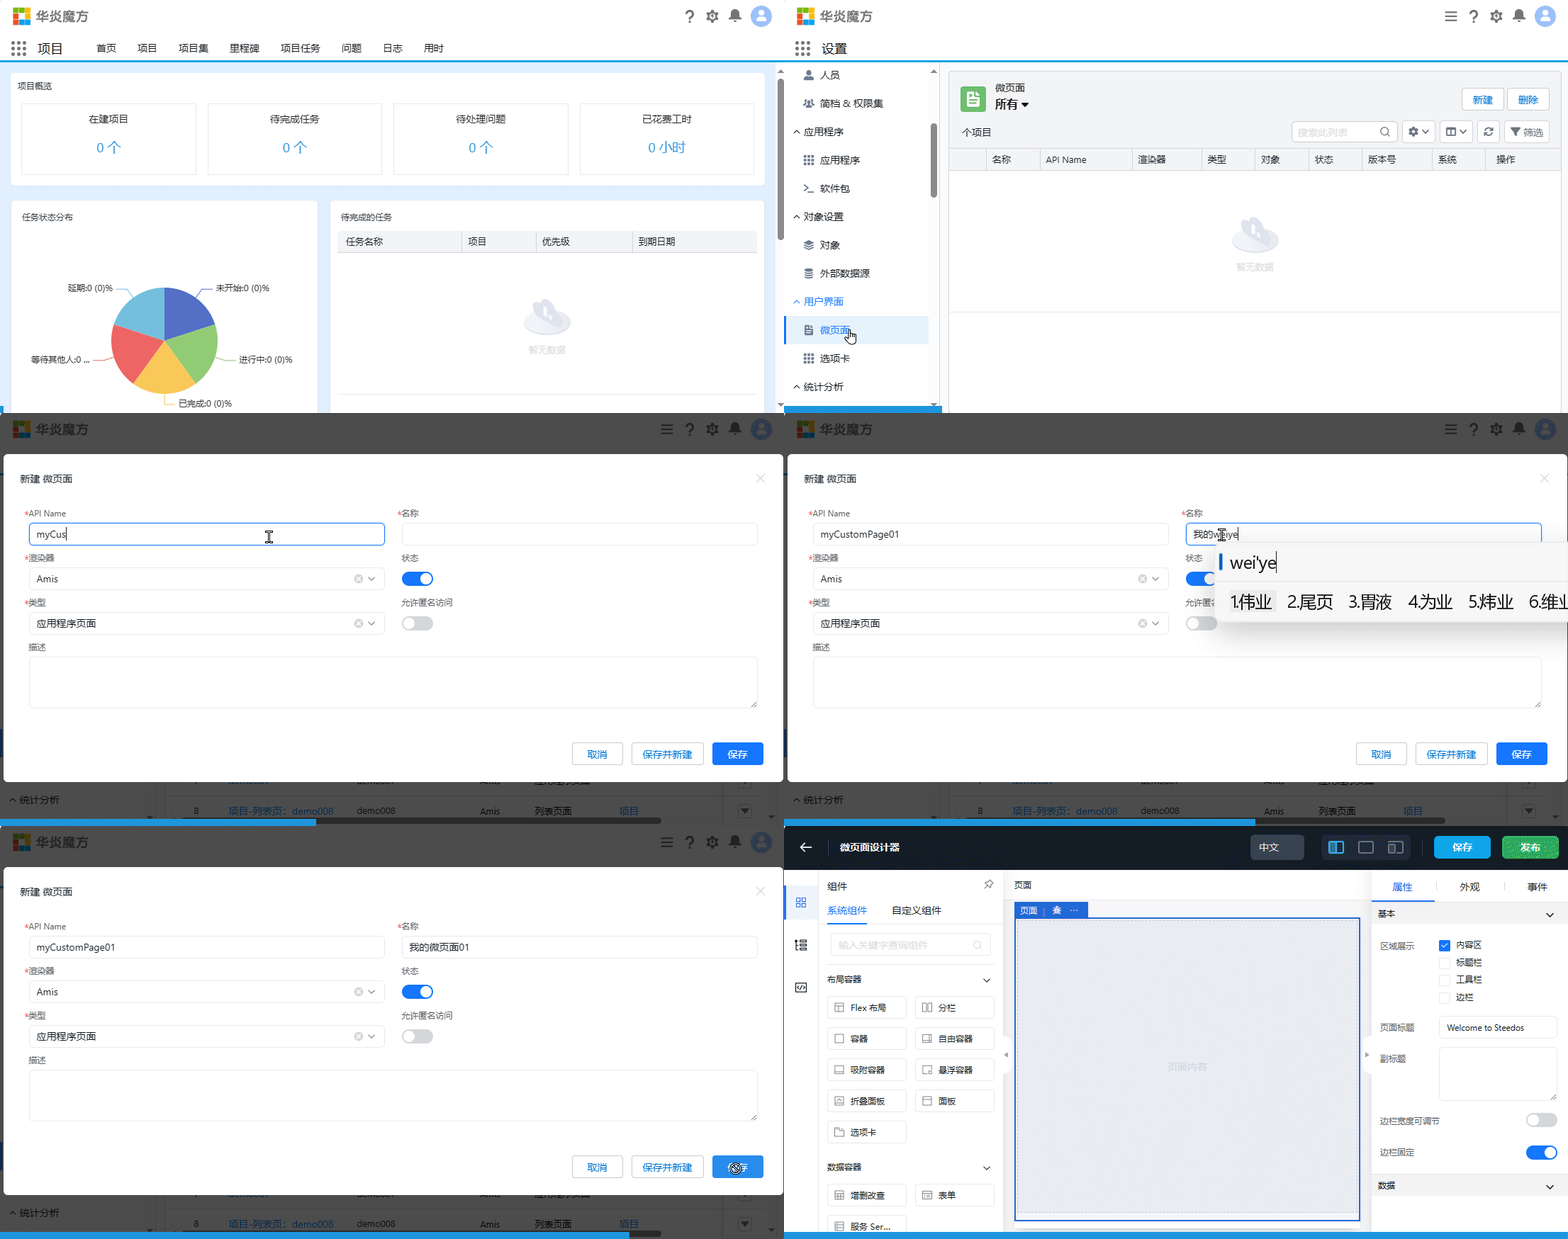
- Open the settings page, then select User Interface -> Micro Pages from the menu
- Choose the type as "Application Page" and click the "Save" button
- After saving, the webpage will automatically redirect to the details page of the newly created micro page
- Click the "Designer" button in the upper right corner to enter the designer of the micro page.
Designing the Micro Page
1. Configure Sending HTTP Requests
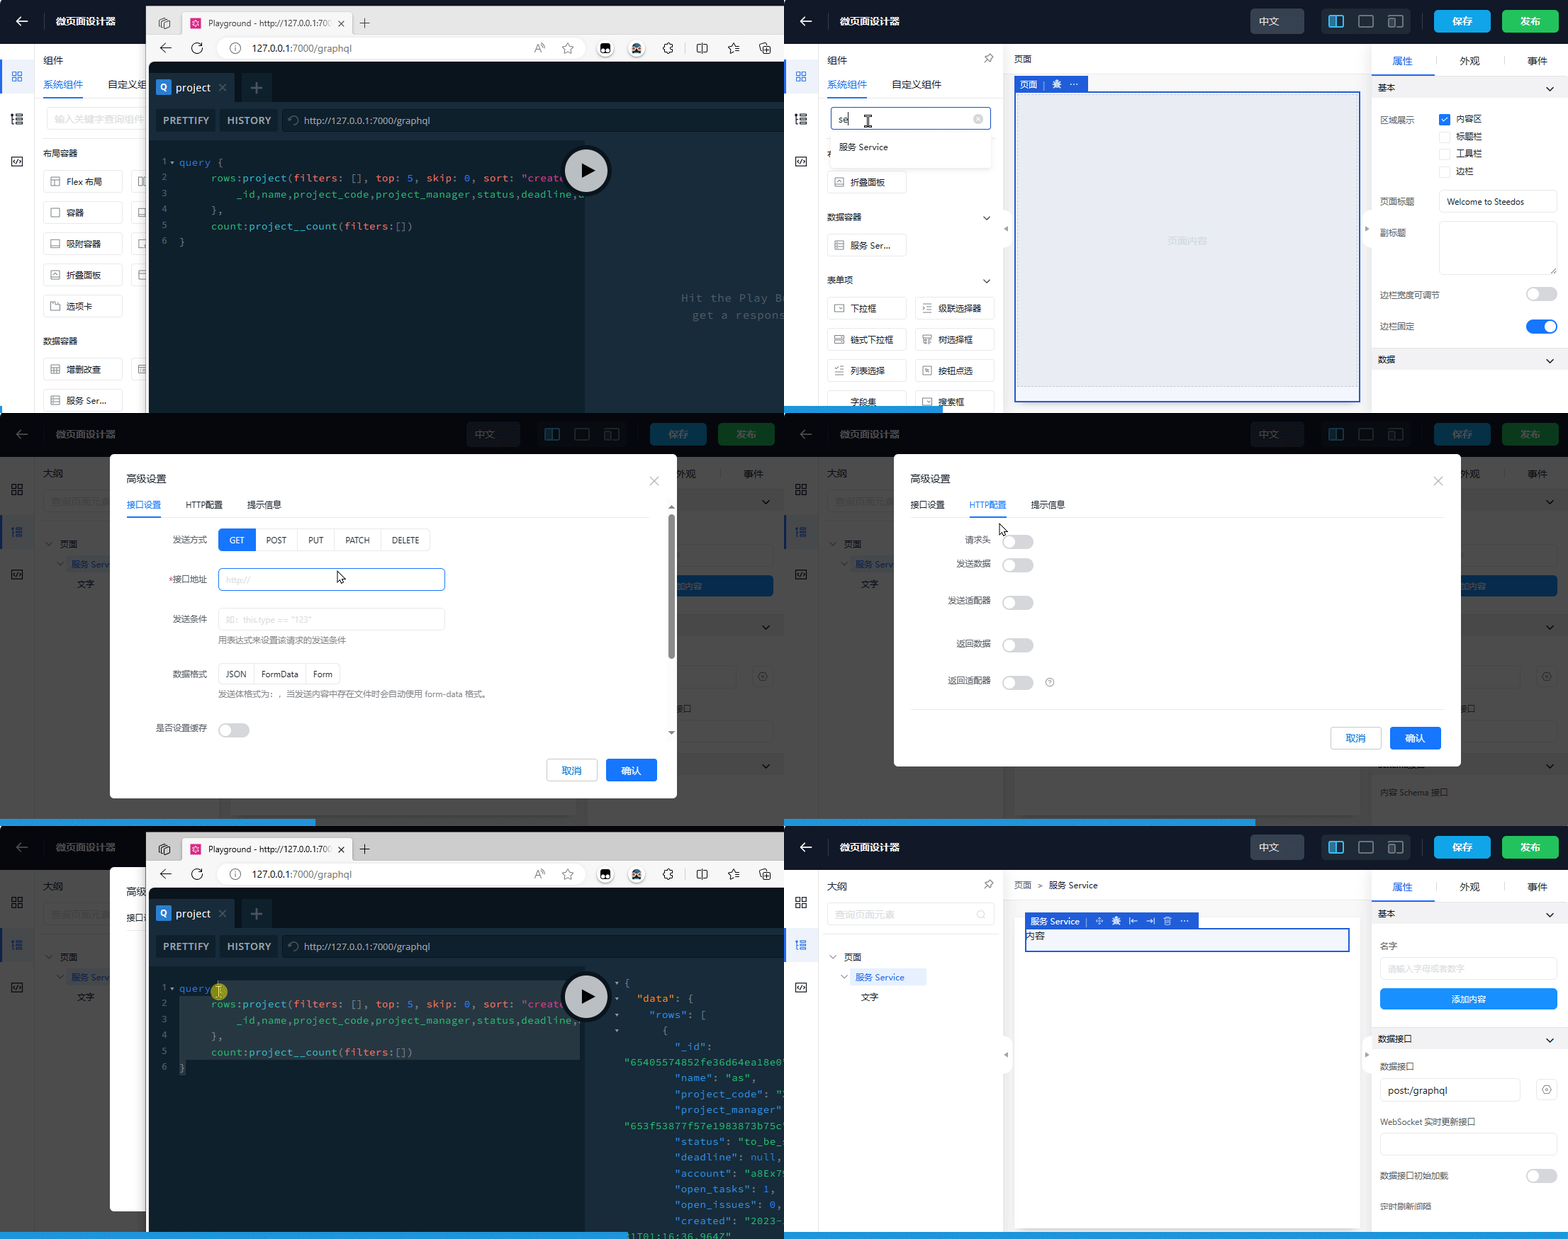
- Drag and drop the Service from the left into the page designer
The purpose of using the Service component is to send a /graphql query HTTP request to the Steedos backend service, and then the result data of its request can be used by child components
- Select the Service component (be careful to select the outer layer of Service, not the "Content" component inside the Service)
- Configure the content of the HTTP request to be sent
- Choose the POST method and fill in the address: /graphql, set the format to json
- Configure the query parameter of the /graphql method
- Save and publish
{
  rows:project(filters: [], top: 5, skip: 0, sort: "created desc"){
    _id,name,project_code,project_manager,status,deadline,account,open_tasks,open_issues, created
  },
  count:project__count(filters:[])
}
2. Check if Data is Obtained
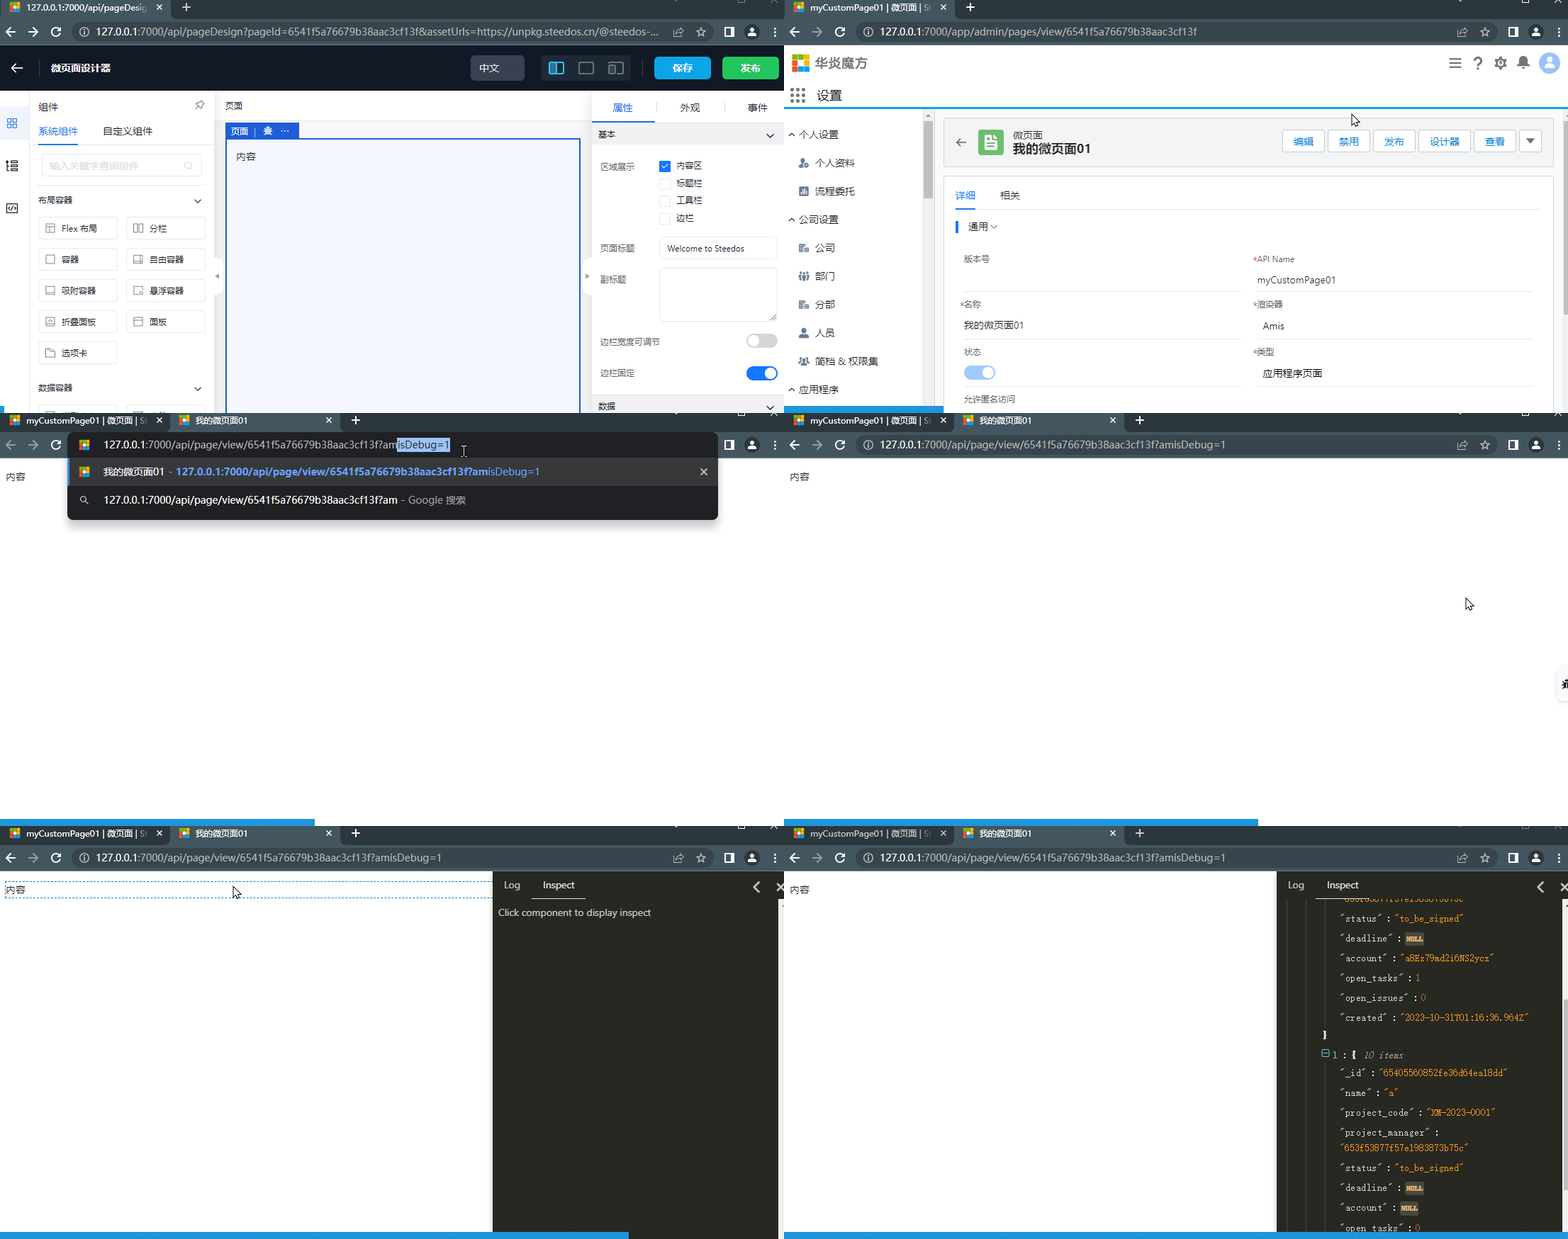
Goal: Check the HTTP request status and inspect the data domain of the component
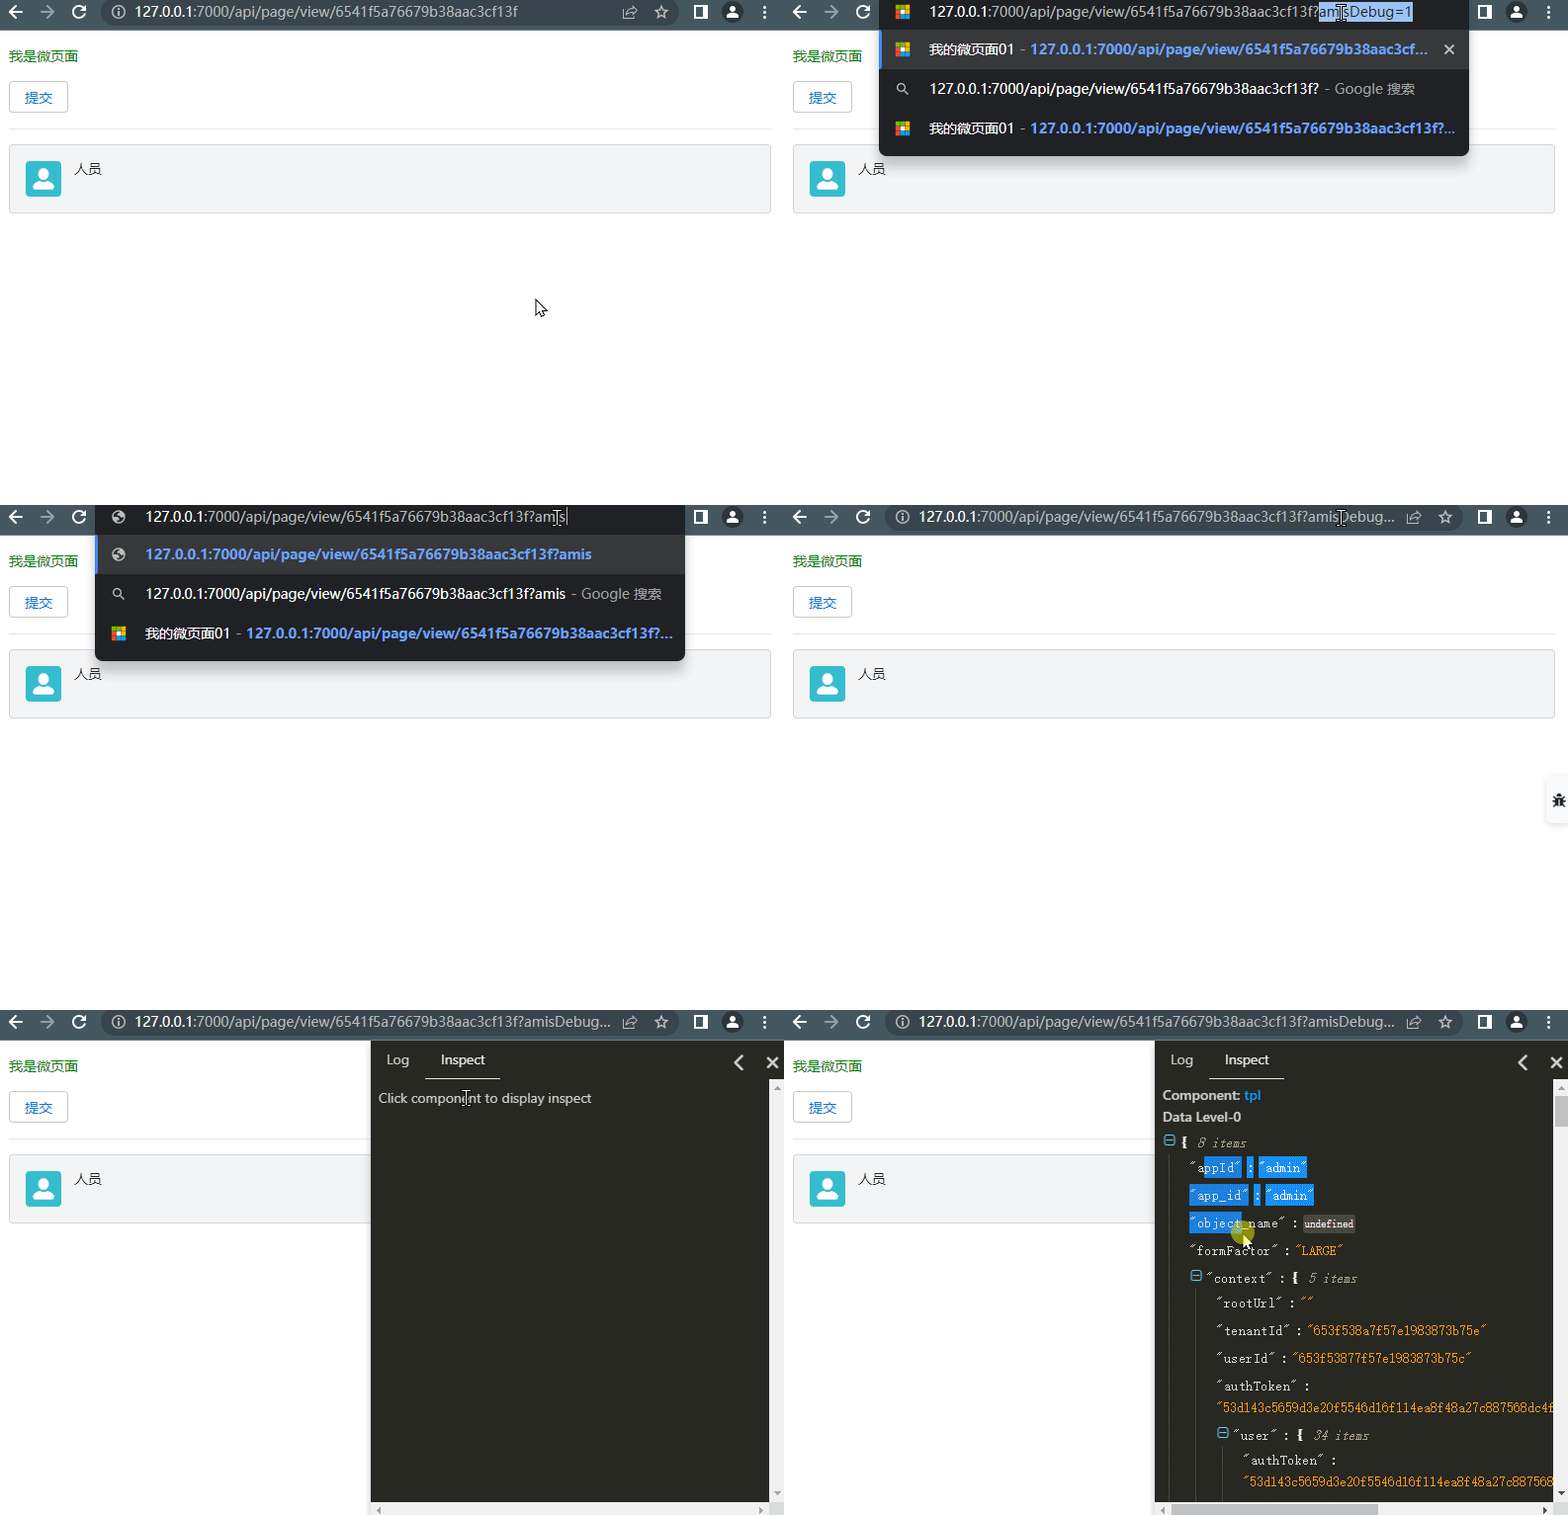
Here we will use the debugging method of amis, as documented: amis Debugging. We will use the third method, adding amisDebug=1 to the URL
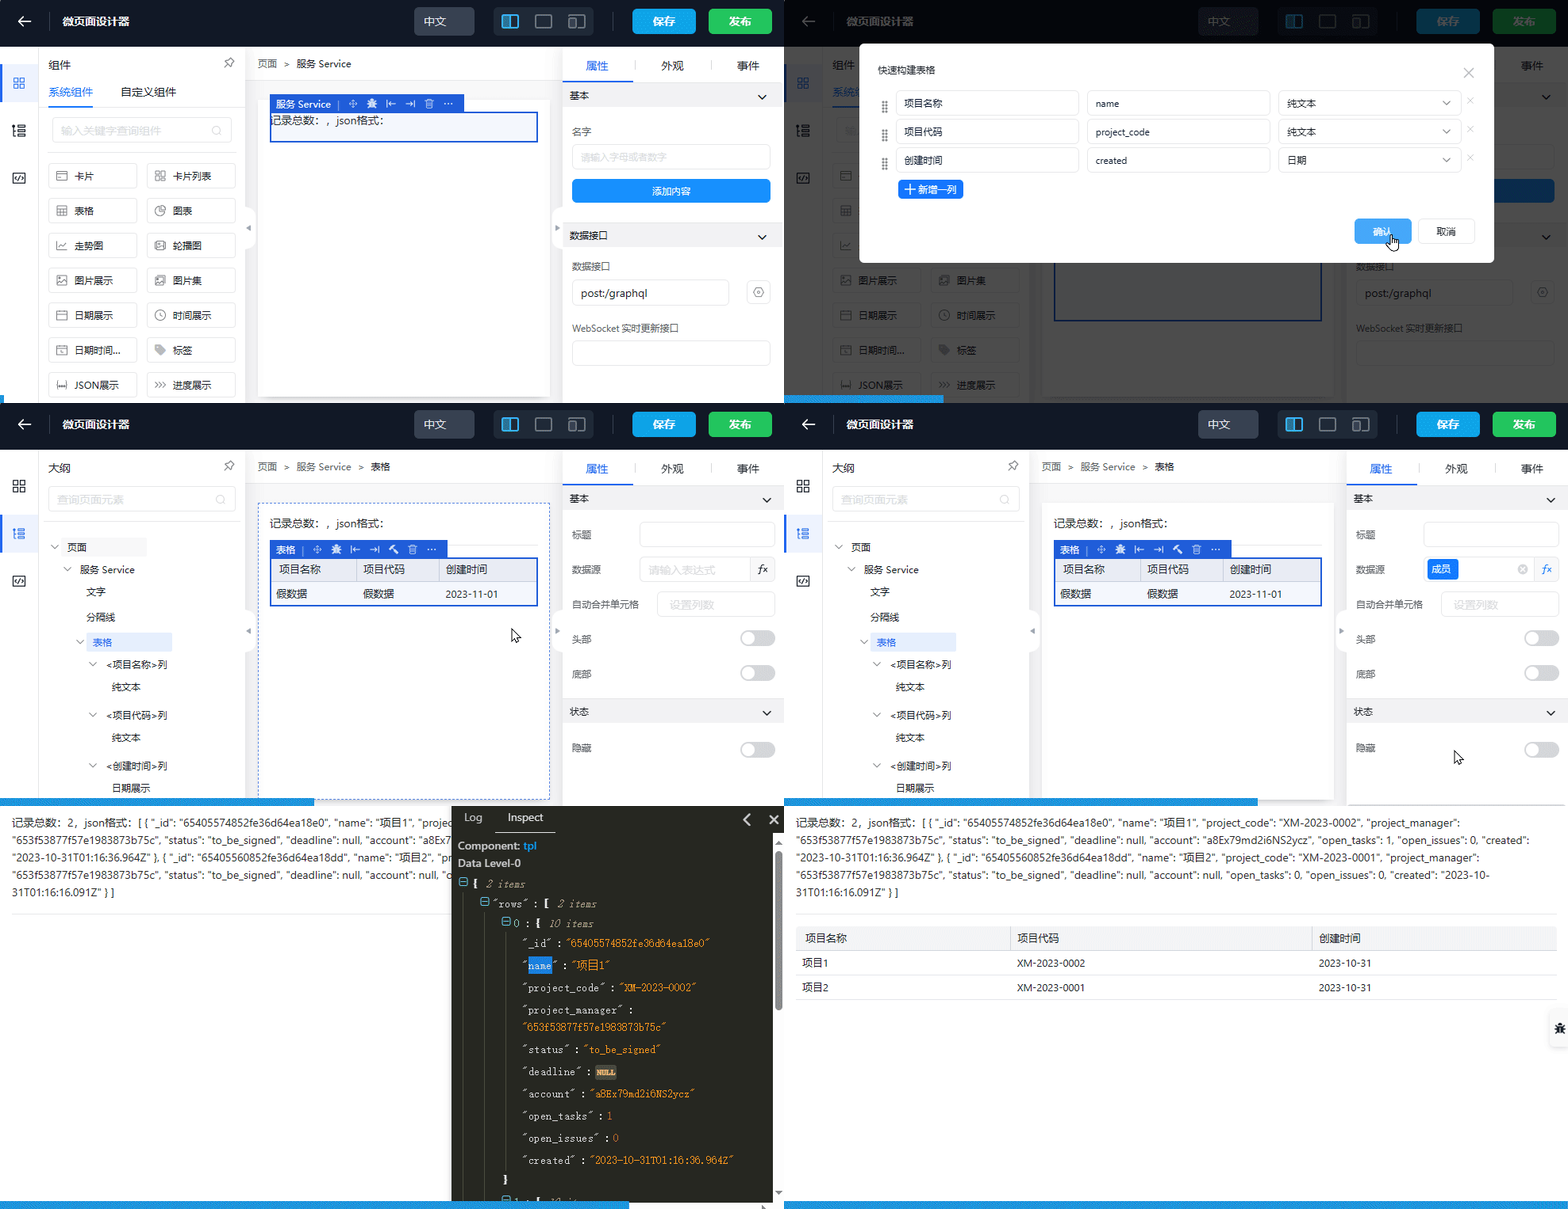
Return to the detail record page of the micro page object, click to view to see the display content of the micro page: This demonstrates how to check the current data of the widget in real-time
3. Display Data Content Through Text Widget
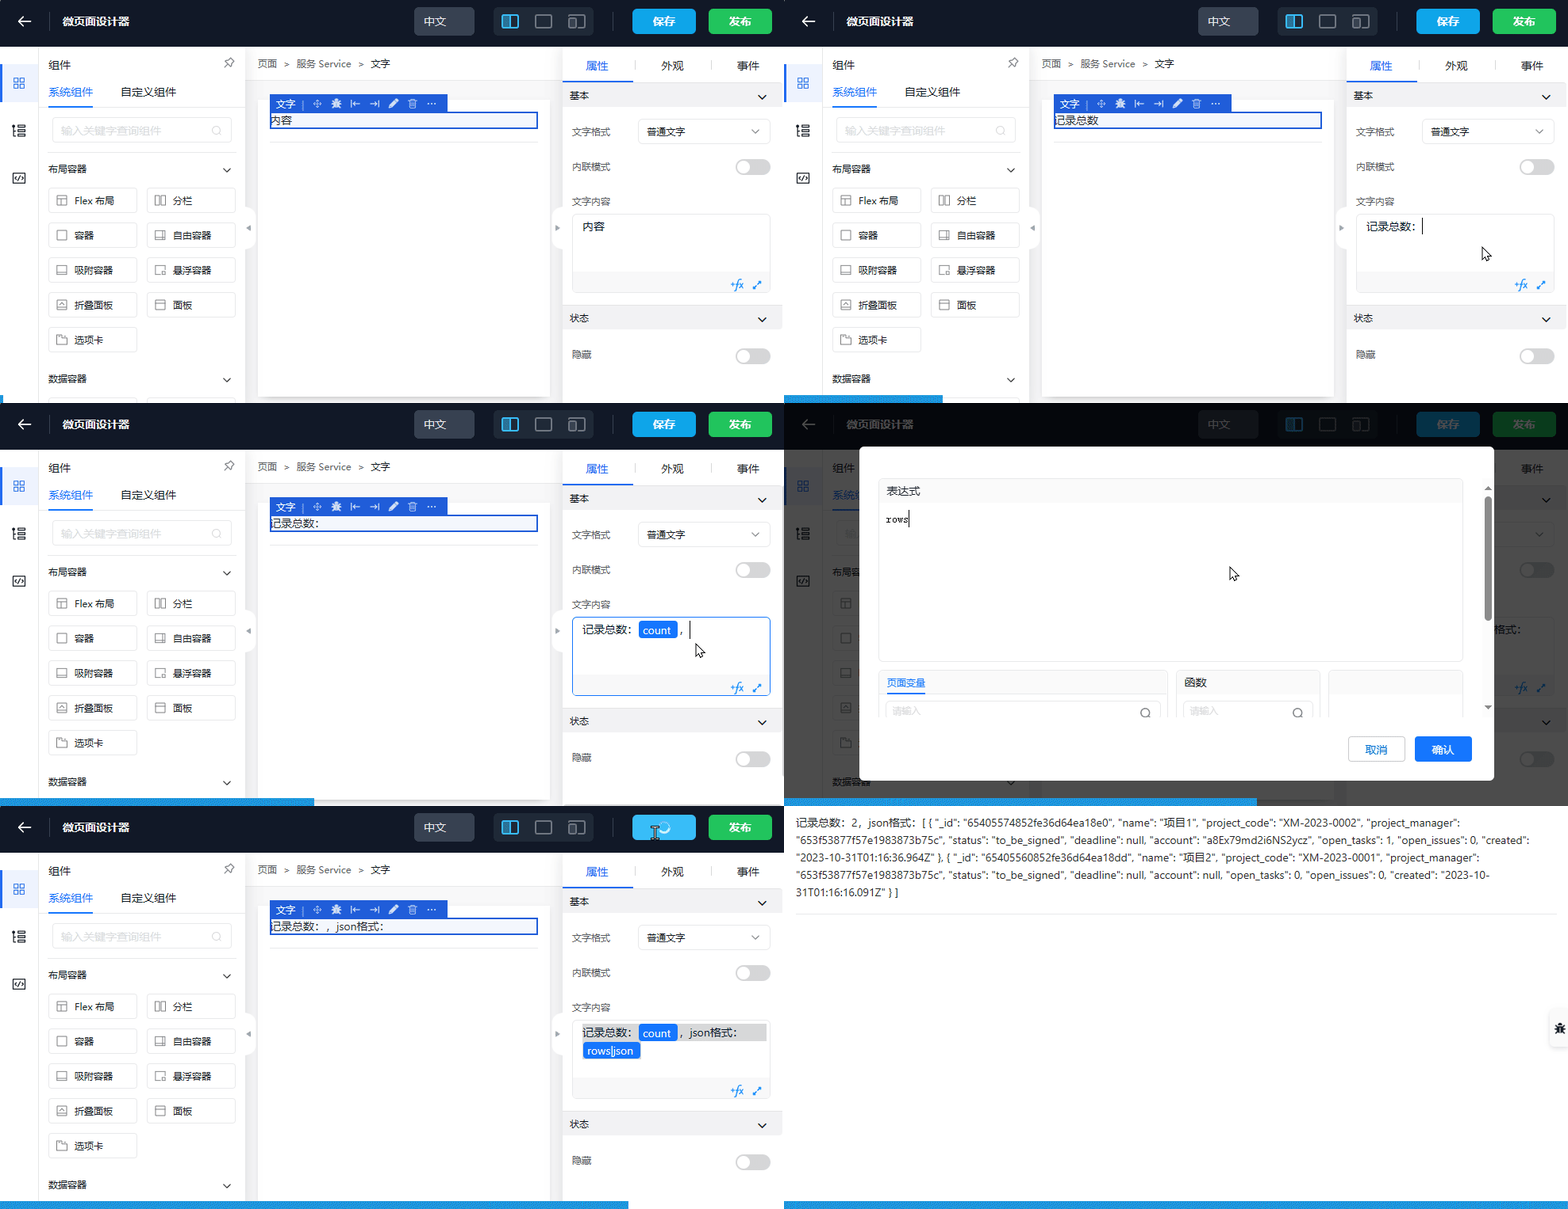
Here we will use the amis template, see: amis Template
- Change the text widget template in the designer, save and publish
- Go back to the viewing page to check
4. Display Data Through Table Widget (table)
The data of each record obtained includes fields:
- Project Name name
- Project Code project_code
- Creation Time created
- Drag and drop the table widget into the Service content. Note that it cannot be dropped into the root directory
- Edit the column mapping, edit the data Source
- Save and publish
- Go back to the viewing page to check if it's normal
Enable Debugging
amis has built-in debugging tools that allow you to view internal component logs and data, which is convenient for analyzing problems. It is currently displayed on the right side of the documentation.
- Add amisDebug=1 to the URL query parameters of any micro page to enable it.
- For example, change
http://xxx.com/viewtohttp://xxx.com/view?amisDebug=1
Reference document: amis Debugging Tool
Display in the Application
Assuming we have designed and published the page, the following steps describe how to bind the "Application Page" type micro page to a tab and make it visible to the end-users.
- Enter the "Settings" application, click the "User Interface->Tabs" menu on the left, and then click the new button in the upper right corner to create a new tab.
- When creating a new tab, select "Page" for the "Type", and then select the micro page we just published in the "Page" property to bind to the tab.
- Click the "Applications->Applications" menu on the left side of the "Settings" application, create a new application or edit an existing one, and select the newly created tab in the application's tab properties.
- Refresh the browser and click the grid in the upper left corner, then click to enter the newly created application in the pop-up "Application Launcher".
- At this point, you can see the newly created tab in the top navigation bar. Clicking on this tab will take you to the custom page we designed earlier with amis.
Creating Tabs
By creating tabs, you can display micro pages in custom applications. If you need to implement parameterized micro pages, you can create an external link type of tab and configure its link address to the micro page access address.
The micro page access address format is /app/${appApiName}/page/${pageApiName}[?dynamic parameters], the rules are as follows:
- appApiName is the API name of the application
- pageApiName is the API name of the micro page
- The parameters after ? are optional and can be written according to the normal URL Query method.
For example, if the external link is configured as /app/oa/page/oa_home?company_id=619383545b2e9a72ec0558b3, it means that when you click on the tab, you open the micro page with the API name oa_home under the application with the API name oa, and pass in a parameter named company_id.
With the formula script feature, we can dynamically pass the current logged-in user's "Subdivision" value to the micro page's "Belonging Company" parameter by configuring the external link address of the above tab as {{`/app/oa/page/oa_home?company_id=${global.user.company_id}`}}.
The above method is only suitable for micro pages of the "Application Page" type, and other types of micro pages do not have the ability to configure parameters for the page.
Configuring Permissions
After designing and publishing the micro page, we still need to configure access permissions for each micro page to make it visible to the end

